
Connections to the cluster are usually done using the SSH Protocol. Linux and MacOS support this protocol natively, for Windows several third-party programs to establish SSH connections are available. For transferring data, the Secure Copy function (scp) exists, see below. While SSH mostly focuses on the Linux console, it is also possible to open application windows via the X window system, if the connection and your system are set up for it.
The address of the cluster will be e-mailed to you upon registering your account. You can reach it by typing:
ssh <YourUsername>@<cluster address>On this page you will find more detailed information for setting up SSH connections from Linux, Mac OS and Windows. You should read through the Linux section in any case because the others heavily reference it.
The authentication for your login on the cluster happens by entering your username and password (this is the same password as for other Uni Siegen services, e.g. Webmail). You can also generate a public/private key pair, so that a connection from a specific computer to the cluster is possible without having to enter a password.
Caution:
- Your user account has to be registered for HPC access for you to be able to connect to the cluster.
- Access with username and password is only possible from within the Uni Siegen network or the Uni VPN! You can however access the cluster from the outside if you set up password-less login via a public/private key pair, see below.
By default you can only open console-based programs via an SSH connection. It is also possible to run programs that open windows, as long as an X server is available on your computer and the SSH connection is configured properly. This is also described below.
SSH setup: Linux
In the Linux console you can open an SSH connection with the ssh command.
ssh <YourUsername>@<cluster address>X forwarding
For a connection with X forwarding, i.e. connections that allow opening windows, the SSH connection needs to be started with the -X option:
ssh -X <YourUsername>@<cluster address>Alternatively, the -Y option does mostly the same. The difference is that with -Y the connection is treated as “trusted”, meaning fewer security checks are performed. This is only recommended if an application does not work with -X.
Configuration of SSH connections
You can preconfigure your SSH connection to the cluster so that you do not need to enter the lengthy SSH command above every time. To do that, open the file <YourHomeDirectory>/.ssh/config on your computer (not the cluster!) with a text editor and enter:
host omni
  HostName <cluster address not shown here due to security reasons>
  User <YourUsername>
  ForwardX11 yes
The first line is the name of your shortcut. This can be any name, in this case omni. The line User is for the username with which you want to login every time. The line ForwardX11 yes is optional. If you add this line, connections will always be started with X forwarding. This is identical to the -X option, the equivalent for -Y would be ForwardX11Trusted yes. There are additional configuration options which may be useful to some to users but will not be detailed here.
With this example configuration you can now login from your computer with the shortcut
ssh omniPassword-less access
If you want to log in on the cluster without having to enter your password every time, you can generate a public/private key pair. This functionality is built into SSH. You have to perform the following steps:
- Run
ssh-keygenon your local machine. This will generate a key pair, which by default has the namesid_rsa(private key) andid_rsa.pub(public key). If a key pair already exists, you will get a warning message. In that case you can either cancel key generation by pressingCtrl+Cand use the existing key pair, or specify another name or path for the new key pair. - You will be asked whether you want to specify a passphrase. This would be more secure, but also means that you have to enter the passphrase at regular intervals.
- Next, you open the
id_rsa.pubfile with a text editor again. - Log into the cluster on a new console, change into the
.sshdirectory on the cluster and open theauthorized_keysfile with a text editor. -
Copy the contents of
id_rsa.pubinto theauthorized_keysfile.Caution: Make sure that you copy the public key (
.pub) and not accidentally the private key. Your private key should always stay on your local computer and you should not share it with anyone. - Save the
authorized_keysfile. -
Log out from the cluster (with
exit) and log back in to test whether your password-less login works.
Tip: You can put multiple key entries into the authorized_keys file if you want to log in from multiple computers, they should be separated by empty lines. An entry always consists of three parts, separated by spaces: an information block about the used encryption algorithm (typically ssh-rsa), the actual key and an optional name that you can modify. The latter helps to keep track of which key is which.
SSH setup: Mac OS
In Mac OS you can open a Linux-like console by opening the Spotlight search and typing terminal or by installing iTerm. For X forwarding you will also need XQuartz.
Setup works the same as with Linux systems, including password-less access and, if XQuartz is installed, X forwarding. However XQuartz requires another step to work. In the file ~/.ssh/config, add the lines:
host *
  XAuthLocation /opt/X11/bin/xauth
After that, X forwarding will work as it does in Linux.
SSH setup: Windows
In Windows, a number of programs to create SSH connections exist. The setup for PuTTY version 0.70 as well as MobaXTerm version 10.5 are detailed below. A pure command line tool is also available in the form of the Windows version of OpenSSH, which is explained (in German) elsewhere on the ZIMT website. You can in principle use any software that supports SSH to connect to the cluster.
Putty (and WinSCP)
To connect to the cluster using Putty, the minimum configuration you have to do is enter the cluster address in the field “Host Name” on the configuration page that opens when you launch Putty. The other fields can be left at their defaults. When you then click “Open”, a connection is already possible.
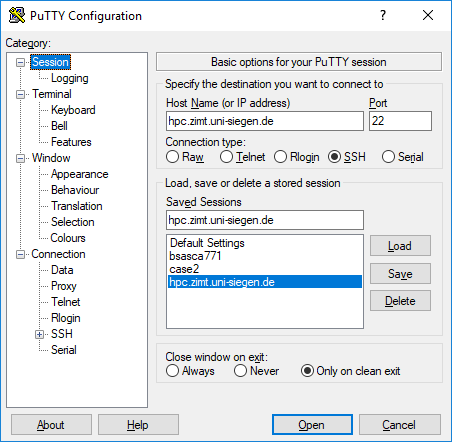
It is however a better idea to create a more extensive configuration for the cluster and save it so the information does not have to be re-entered every time. In addition, all the features described in the Linux section above (X support, password-less access etc.) can be preconfigured in Putty.
Putty does not come with its own X server. For that, a separate program like XMing needs to be installed and running when Putty is started.
To save the configuration, you need to give it a name in the “Saved Sessions” field and confirm it with “Save”.
Putty setup
To save your settings you first need to create a “Saved Session” for the HoRUS cluster by entering a name for your session on the main configuration page and confirming it with “Save”.
The Putty configuration menu has a lot of settings pages, which you can reach by clicking on elements of the tree on the left hand side. Caution: After changing any Putty settings it is necessary to click “Save” on the main page again to save the configuration.
Useful settings in Putty are for example:
-
A previously generated public/private key pair can be used for login by going to the “Connection > SSH > Auth” page and specifying the path to the private key on your own computer. The public key needs to be copied to the cluster as described in the Linux section to enable password-less login.
-
If the box “Enable X11 Forwarding” in the menu “Connection > SSH > X11” is checked, the connection is always started with X forwarding.
-
On the page “Connection > Data”, an “Auto-Login Username” can be specified. This name will then be used automatically and does not need to be entered manually every time.
Password-less access
Putty has its own key generator named PuttyGen. It is located in the Putty installation directory (in Windows 10 you can simply enter “puttygen” in the Start menu and it will be listed). To generate a key pair you need to click “Generate” and then move the mouse around for several seconds to generate random numbers. After the key pair is created, you need to save both keys. Finally the public key needs to be copied to the cluster as described in the Linux section.
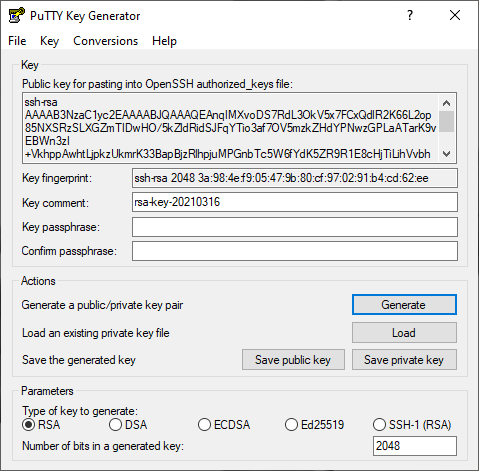
Caution: Puttygen saves keys in individual text files, just like OpenSSH, but the format is slightly different. When Puttygen has generated a key pair, the public key will appear in OpenSSH format in the window, so that you only need to copy it and paste it intoauthorized_keys on the cluster.
WinSCP
To copy files to the cluster or from the cluster to your computer, the scp (Secure Copy) program on the cluster can be used, see below. Alternatively, the WinSCP program can be installed. The advanced options in WinSCP allow most of the SSH settings, similar to Putty.
MobaXTerm
To connect to the cluster using MobaXTerm, you first need to create a new SSH session. The configuration page for that session is shown below:
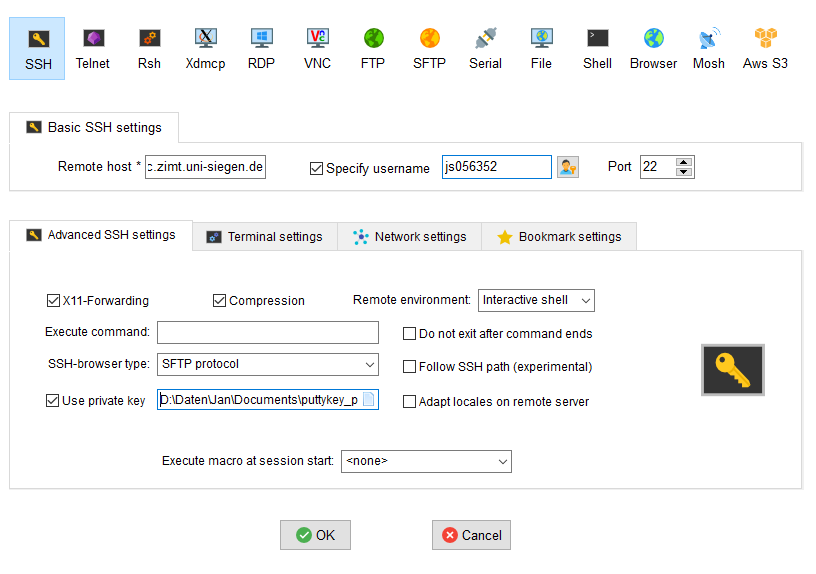
In the “Remote Host” field you need to enter the cluster address. Like all programs described above, a username, X forwarding and passwordless access can be specified. MobaXTerm already contains an X server, you do not need to install any additional software. MobaXTerm also has a key generator in the “Tools” menu, which works identically to PuttyGen.
File transfer
If you want to transfer files to the cluster or from the cluster to your PC, you can do this with the secure copy command (scp). If your operating system offers an ssh command, it will typically also offer the scp command.
The syntax is similar to the Linux command cp, with the key difference that you need to specify the computer name (hostname) and, if necessary, other SSH options like your username, for remote computers:
scp <source file name> <Target hostname>:<target path>Example:
scp example_folder/example.txt YourUsername@examplehost.uni-siegen.de:/home/demo_user/Note that the path to the target is separated from the target hostname with a colon. The above example would copy a local file to the cluster. If you want to copy a file from the cluster to your PC, the source file needs to have a hostname in front of it (and the other SSH options if necessary). You can also copy a file from one remote system to another, in this case you need to specify hostnames for both. If you specify a non-existing filename as the target, the file is saved under that name. Instead of a complete hostname, you can also use an SSH preset, as described above under configuration of SSH connections.
Unlike cp, the scp command prints out the transfer status of each file.
It is not possible to run scp on the cluster itself, this has to do with the university’s firewall setup. No matter in which direction you are copying, you always need to run scp on your PC. Note that you also need to add the -r option if you want to copy entire folders, just like with the cp command. You can display additional options with man scp.
Options other than scp
There are other ways of transferring files in addition to scp. The rsync command works in a similar way to scp, is also available on every Linux and Mac OS system and can do more complex operations like for example continuing a transfer after a connection loss.
Additionally, there are multiple graphical clients that allow file transfer with various methods. Example are the already decribed MobaXTerm and WinSCP (both Windows), Filezilla (Windows and Linux), Forklift (Mac OS) and the built-in file browser of Gnome-based Linux distributions (e.g. Ubuntu). Here you need to consult the documentation of the software you want to use.